Contents [hide]
- Management VRF (Virtual Routing and Forwarding)
- Out-of-Band Management Port (OOBM)
- Configuring Mgmt Interface
- Ping and Traceroute in the Management VRF
- SSH for AOS-CX
- HTTPS for AOS-CX
- Authentication, Authorisation and Accounting
- Simple Network Management Protocol (SNMP)
- Configuration File Management
- Checkpoint Auto Mode
- Operating system Image Management Introduction
- Password Recovery Process
- Reset to Factory Default
Management VRF (Virtual Routing and Forwarding)
VRF (Virtual Routing and Forwarding) creates separate virtual routers inside a physical router, with separate routing tables. AOS-CX devices have a default VRF for the data plane and a separate management VRF for the management port to handle OOBM traffic.
Out-of-Band Management Port (OOBM)
This port is used exclusively to monitor and manage the switch. Because AOS-CX has a separate management VRF, there is complete isolation between the management and data planes. Data plane can never see or use this port. Management traffic does not use any bandwidth in the data plane. This is commonly referred to as Out-of-Band Management or OOBM.
It is possible to remote in and manage the switch via a normal ethernet port in the data plane. This is referred to as In-Band management. This is convenient but not recommended. A misconfiguration could cause you to lose access to the device. It is also a security concern as hackers could remotely take control of the device.
Configuring Mgmt Interface
The AOS-CX mgmt interface is enabled by default and is set to DHCP.
Use show interface mgmt command to show the state of the interface.
To manually configure IP address:
Conf
Interface mgmt
Ip static <Ipaddress/Mask>
Default-gateway <default gateway IP>
Name servers <DNS Primary server>
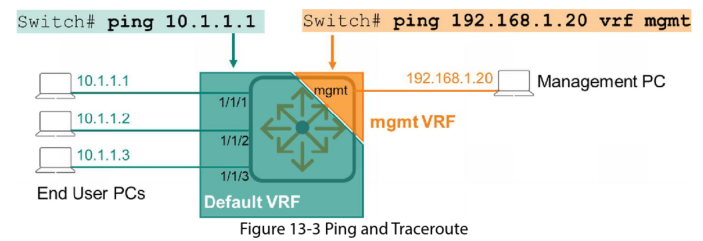
Ping and Traceroute in the Management VRF
By default, AOS-CX switch ping and traceroute commands are for the data planes VRF. To use these commands int the management VRF you must use special ping and traceroute syntax.
SSH for AOS-CX
You must use Secure Shell protocol (SSH) to connect to the AOS-CX switch. SSH provides a secure connection between the switch and your management PC. SSH is enabled by default in the data plane VRF and disabled by default in the management plane (depending on the model). Use this command to enable SSH for mgmt VRF:
Ssh server vrf mgmt
Use the following command to show the status of SSH on the mgmt interface
show ssh server vrf mgmt
Once SSH is enabled in the management plane many administrators prefer to disable SSH in the data plane. This prevents end users and possible bad actors connecting to the management plane.
HTTPS for AOS-CX
HTTPS provides secure GUI access to the switch. Like SSH, HTTPS is enabled by default in the default VRF and disabled by default in the management plane (depending on the model).
Treat HTTPS like SSH:
Enable it in the management plane, then disable it in the data plane VRF
To do this:
Conf
Https-server vrf mgmt
No https-server vrf default
Web Interface
This is the GUI interface that allows you to monitor and manage the device.
The menu is divided into 4 different sections:
- Overview: Analytics, interfaces, VLANs, LAGs, Users POE, and VSF
- System: environmental information, Log, DNS servers, SNMP config, and config management
- Diagnostics: features like Ping and Traceroute
- Traffic: includes Spanning-Tree
Authentication, Authorisation and Accounting
AAA is a security concept that involves three individual processes:
- Authentication: who gets access to the system (usernames and passwords, certificates, PSK etc…)
- Authorisation: grant privileges to authenticated users (eg: read or write access)
- Accounting: tracks user activity. Creates logs and events
Role Based Access Control (RBAC)
RBAC allows you to define groups and set specific permissions for that group. Users can be added to that group and get the permissions (this saves you having to set permissions specifically for each user).
AOS-CX has three default user groups which cant be edited or deleted:
- Administrators: full access
- Auditors: read only access to everything
- Operators: limited access to certain areas
RBAC Configuration
Create a new group
Conf
User-group <groupname>
Map a user account to group
User <username> group <groupname> password plaintext <password>
Use rules to define what commands they can use
User-group monitoring
10 permit cli command "show version"
20 permit cli command "show interface 1/1/1"
The above allows them to only use the commands show version and show interface 1/1/1
RADIUS-Based Management Authentication
You can manage credentials locally on each switch, but this can become a burden if managing hundreds of devices. You can centralise this using AAA services on a Remote Authentication Dial-In User Server (RADIUS) server. Hundreds and thousands of devices can use the RADIUS protocol (UDP port 1812) to access a centralised RADIUS server (a centralised repository for credentials).
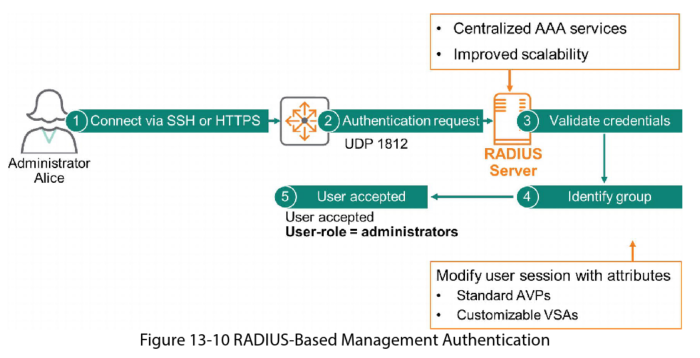
The RADIUS server makes the decision to ACCEPT or REJECT the request from Alice. It can also assign attributes such as connection speed, or in this case it assigns Alice the administrator role.
One of the reasons RADIUS became so popular is because it is customisable by vendors. Using Vendor Specific Attributes (VSA). Aruba has created VSAs specific for its products. Aruba ClearPass is a powerful RADIUS server that uses Aruba’s VSAs.
Simple Network Management Protocol (SNMP)
SNMP is an application layer protocol for exchanging management information between network devices. This is popular for configuring, managing and monitoring network devices from any vendor.
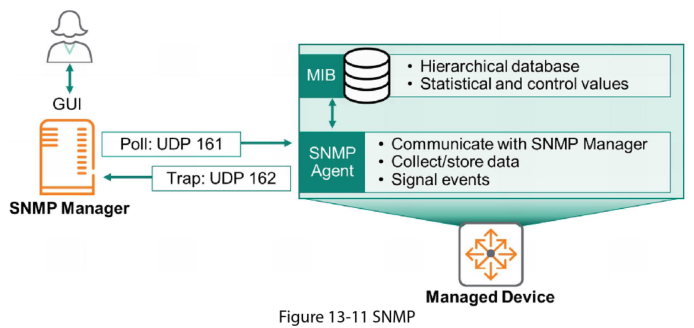
SNMP Manager
This is typically a dedicated server that communicates with the SNMP Agents (managed devices). It uses several message types to gather and modify network device parameters. Its key functions include:
- Queries agents
- Gets responses from agents
- Sets variables in agents
- Acknowledges asynchronous events from agents
Managed Devices
The routers, firewalls, servers, wireless controllers, and any other network devices that can be monitored, managed and controlled. These devices have 2 main components:
- The SNMP Agent communicates with the SNMP Manger about its configuration and status. It stores and receives this information in a Management Information Base (MIB).
- The MIB is a hierarchical database that stores device status, statistics, and configuration information. This is the information that is exchanged between the SNMP Manager and the managed device.
Communication and Ports
Usually the SNMP Manager “pulls” information from the SNMP Agent using simple commands such as: GET, GET NEXT, Get BULK. This communication uses UDP 161. The exception to the “pull” is when a the managed device has important information that cannot wait, EG: “My CPU Utilisation is dangerously high”. In this case the device pushes information to the manager without being asked using an SMP trap. SNMP Traps use UDP port 162.
SNMP Versions
SNMP v1
This is the first version and uses a community string which is like a pre shared pass code.
SNMP v2c
This is a revised version of v1 which has improvements in protocol types, transport mapping, MIB structure. It also uses a community string method.
SNMP v3
This version provides a higher level of security including: message integrity, authentication and encryption
Configuration File Management
An AOS-CX switch uses RAM and Flash memory to save configuration files.
RAM: this is used to save the running config. RAM is not permanent storage, it is erased when a device reboots or powered off. If you modify the running config and don’t save it to the Flash memory, your changes will be lost when the switch reboots.
Flash: this is used to permanently save a config file. This config file is the “startup-config”. When you edit the running config you can save the changes to the startup config using the commands:
copy running-config startup-config
#Or
Write memory
Restoring Config file
To restore a running config from a startup config use the command:
copy startup-config running-config
As best practice you should copy the running and startup config files to an external server. You can use the copy command for this. EG: to copy the running config to a TFTP server with IP address 10.253.1.21:
Copy running-config tftp://10.253.1.21/switch_config.cfg
Checkpoint Auto Mode
There may be situations where you make a configuration change and lock yourself out of your switch due to errors in the configuration. Usually you would have to connect to the switch via the console port to fix this, but checkpoint auto mode has a fix for this.
The fix includes a timer that you set. The system then takes a snapshot of the current state. When you make some configuration changes you are then asked to confirm these changes. If you have lost access to the switch, you cant confirm the changes, then the switch reverts to the previous snapshot after the time expires.
To use this mode:
- Enable checkpoint auto mode: checkpoint auto <minutes>
- The system generates a checkpoint and starts a timer
- Administrator configures the device
- Administrator must confirm the changes for them to be permanent: checkpoint auto confirm
Operating system Image Management Introduction
AOS-CX has two flash memory modules or partitions for storing software image files. These are referred to as primary and secondary images.
Having two memory locations allows easier management to plan firmware upgrades. EG: you can download the new firmware to the flash memory that is not in use then instruct the switch to boot from that during a maintenance window.
The command show images shows information about the software images in the primary and secondary images.
You can update the switch using the GUI or the CLI. Using the CLI with SFTP:
Copy sftp://admin@10.10.1.1/GL.10.04.003.swi primary
Password Recovery Process
- Connect to the switch console port
- Power cycle the switch
- When you have the option, select the service OS console option by selecting “0”
- Log in with the user admin. No password is set for this account
- Enter password keyword, then enter the new password
- Enter boot
- Login with new admin username and password
Reset to Factory Default
To restore to factory default use the command:
erase all zeroize
To delete the startup checkpoints in the system use the command:
erase startup