Contents [hide]
Virtual Networks
A virtual network is like the glue that binds various resources together in the infrastructure as a service model.
EG: a VM without a Virtual network would be a standalone VM without any access to other resources.
Virtual networks don’t have any cost. There is a limit of around 250 virtual networks per region.
Before creating your Virtual Network you need to plan it out properly. You don’t want your VNet address ranges to overlap.
Creating a VNet
- Search for Virtual Network and click Create
- Basic Option:
– Subscription
– Resource Group (this is unique to your account in that region)
– Name: Virtual Network name
– Region - IP Addresses options:
– IPV4 Address Space: set you private IP range in the CIDR format. EG: 10.0.0.0/24
– Subnet: here you can add a subnet. Give it a name and select the subnets address range - Security Options: at this stage you can add a Firewall or Bastion host. You need a new subnet for these.
- Select Review & Create
Public IP Addresses
Creating a Public IP Address
- In the Marketplace search for Public IP
- Click on Create
- Set the options:
– Give it a name
– SKU: if using a load balancer the SKU must much that
– Select IP version
– Select Static or Dynamic assignment
– Idle timeout: clients will timeout after this set time
– DNS name label: the DNS name associated with the IP address. This will have the Azure format but you can map it to your own domain using a Cname record
– Select the Subscription
– Select the Resource Group and Region - Click on Create
Network Routing
A routing table is a database that keeps track of paths, like a map, and uses these to determine which way to forward traffic.
https://en.wikipedia.org/wiki/Routing_table
Create a Route Table
- In the Marketplace search for “route table” and click Create
- Select your options:
– Give it a name
– Select the subscription
– Select the Resource Group and Region - Click create
Adding a Route
In this route we will send any traffic that comes from “Subnet1” through a firewall
- Once the route table is created go to the resource
- Go to Routes (there will be nothing there at this stage)
- Click on Add
- Set your options:
– Route name
– Address prefix – the address of where the traffic is coming from (Subnet1 in this example)
– Next hop type: Virtual appliance (this will be the firewall)
– Next hop address: IP address of the firewall - Click OK
Associate Route Table with subnet
- From the Route table overview go to Subnets
- Click on Associate
- Select the Virtual Network the Subnet is in
- Select the Subnet
VPNs and Express Route
Azure VPN
- This allows you to join an outside machine or network into an Azure network.
- Private – meaning end to end encryption
- VPN allows you to access systems using private IP addresses
VPN Options
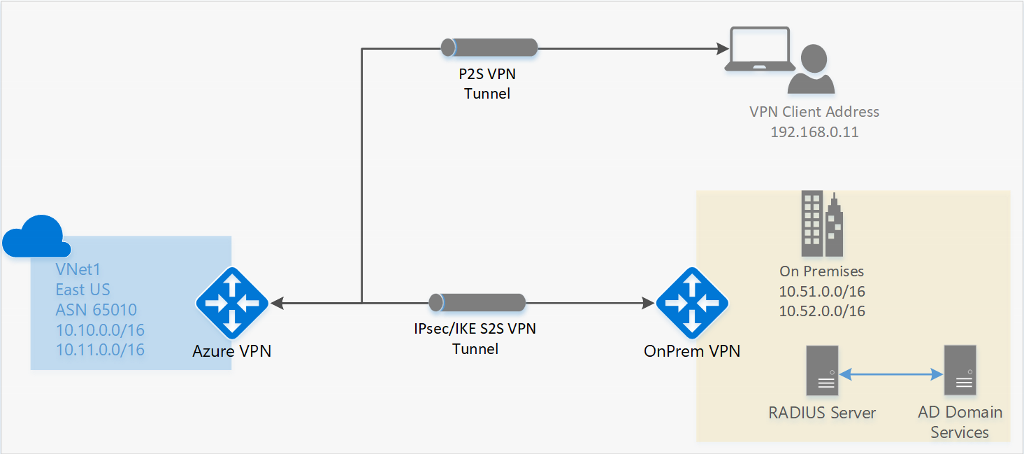
Point to Site (P2S) VPN
- This is a secure connection to your virtual network form an individual client computer.
- This is encrypted traffic that travels over the internet
- Configuring this is as simple as installing some software on your computer and configuring it.
Site to Site (S2S) VPN
- is a secure connection from your entire onsite private network to your Azure virtual network.
- is encrypted traffic that travels over the internet
- requires a physical VPN gateway on your onsite private network side
Express Route
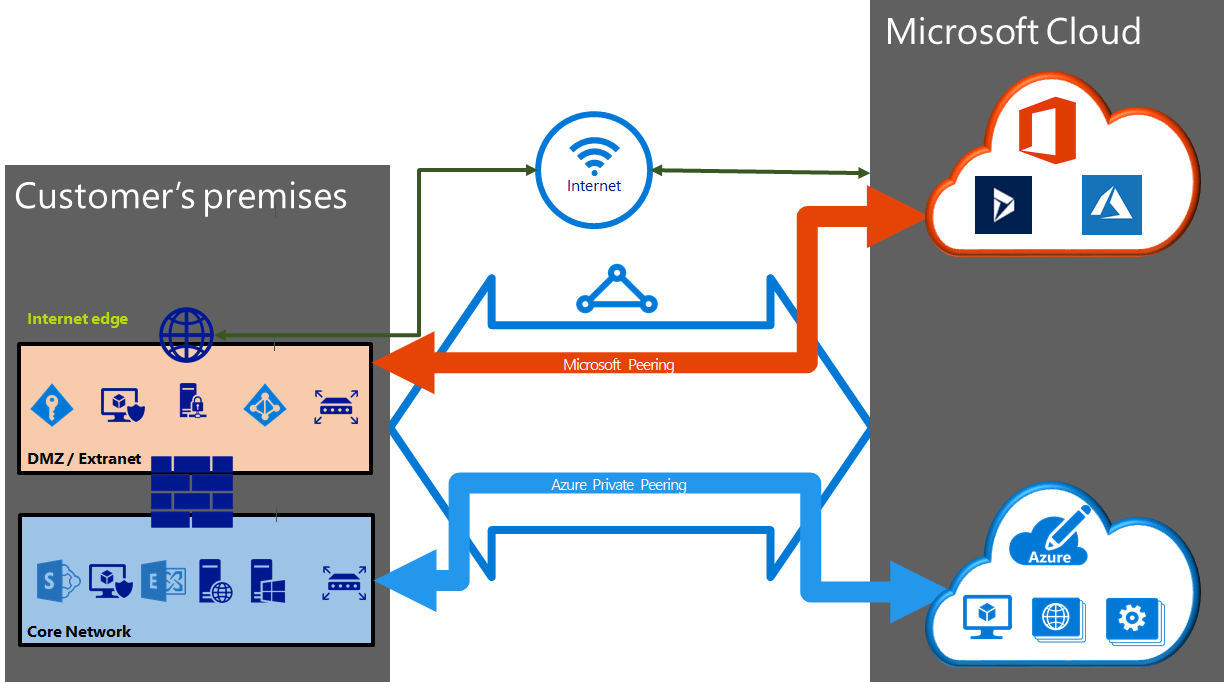
- This is a private connection to Azure
- It does not travel over the internet
- This is extremely fast and expensive.
- Need to work with a communications provider to set it up
Microsoft Peering: this is connectivity to Microsoft online services (Microsoft 365)
Azure Private Peering: this is connectivity to Azure compute services (virtual machines etc…)

Express Route Premium Add-on: this allows you to connect to VNets all over the world, not just your local region. It also increases the number of VNets you can connect to from 10 to whatever your bandwidth will allow
Number of virtual networks per ExpressRoute circuit
| Circuit size | Number of virtual network links for Standard | Number of virtual network links with Premium add-on |
| 50 Mbps | 10 | 20 |
| 100 Mbps | 10 | 25 |
| 200 Mbps | 10 | 25 |
| 500 Mbps | 10 | 40 |
| 1 Gbps | 10 | 50 |
| 2 Gbps | 10 | 60 |
| 5 Gbps | 10 | 75 |
| 10 Gbps | 10 | 100 |
| 40 Gbps* | 10 | 100 |
| 100 Gbps* | 10 | 100 |
NUMBER OF VIRTUAL NETWORKS PER EXPRESSROUTE CIRCUIT
*100 Gbps ExpressRoute Direct Only
From <https://docs.microsoft.com/en-us/azure/expressroute/expressroute-faqs>
Express Route Pricing
| Circuit bandwidth | Standard price per month | Premium price per month | Inbound data transfer included | Outbound data transfers included |
| 50 Mbps | $75.515 | $178.49 | Unlimited | None |
| 100 Mbps | $151.03 | $274.60 | Unlimited | None |
| 200 Mbps | $199.085 | $405.035 | Unlimited | None |
| 500 Mbps | $398.17 | $947.37 | Unlimited | None |
| 1 Gbps | $598.628 | $1,628.378 | Unlimited | None |
| 2 Gbps | $1,197.256 | $3,256.756 | Unlimited | None |
| 5 Gbps | $2,993.14 | $7,112.14 | Unlimited | None |
| 10 Gbps | $4,668.20 | $8,787.20 | Unlimited | None |
Monthly price estimates are based on 730 hours
From <https://azure.microsoft.com/en-au/pricing/details/expressroute/>
Express Route Direct
This option allows you to connect directly to Microsoft global backbone.
This gives even higher speeds.
- 10 Gbps and 100 Gbps
You can have multiple circuits on one connection
You must have internal network that supports these speeds.
Azure Firewall
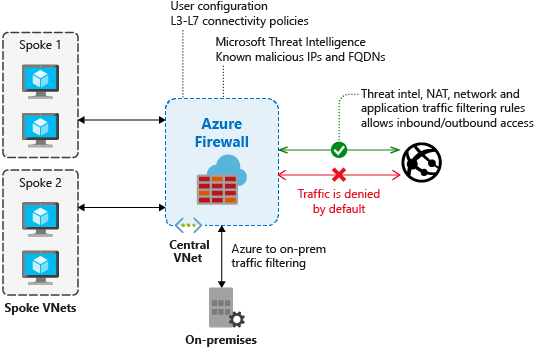
Azure Firewall is a managed, cloud-based network security service that protects your Azure Virtual Network resources. It’s a fully stateful firewall as a service with built-in high availability and unrestricted cloud scalability.
From <https://docs.microsoft.com/en-us/azure/firewall/overview>

Creating a Firewall
- Go to Marketplace and search for Firewall
- Click on Create
- Set your Basic options:
– Subscription
– Resource Group
– Name
– region
– Virtual Network (choose current or create one)
– Address space
– Set subnet
– Public IP (create or use current one)
– Forced Tunnelling: if enabled this forces all traffic from the subnet to go through the firewall - Click on Create
Configuring Azure Firewall
Before using the Firewall with a VM we need to create a route for all traffic from the VM subnet to go through the firewall. We have current this in previous section but the high level steps are:
- Create routing table
- Associate the route table with the subnet that the traffic will be coming from( the VMs)
- Create a route
– for all traffic (0.0.0.0/0)
– Next Hop is Virtual Appliance
– Next Hop Address: private IP of the firewall
Configuring Rules
Application Rule
In this example we will allow http and https to microsoft.com
- Go to the Firewall -> Rules
- Click Add Application Rule
- Give it a name and set the Priority(lower the number the higher the priority and Action (Block or allow)
- In the Target FQDN section set the following:
– Give it a name
– Source type: Ip address
– source the ip range of the VMs
– Protocol/Port: http, https
– Target FQDNs: www.microsoft.com - Click add
Networking Rule
This is similar to the Application rule except you are using IP addresses instead of FQDN. In this example we will create a rule for DNS (otherwise VMs wont be able to look up anything)
- Go to the Firewall -> Rules
- Click Add Network Rule
- Give it a name and set the Priority(lower the number the higher the priority and Action (Block or allow)
- In the Rules IP Addresses section set the following:
– Give it a name
– Protocol: UDP
– Source type: Ip address
– source the ip range of the VMs
– Destination type: IP address
– Destination Address: Microsoft DNS servers (these need to be the DNS server of the VM)
– Destination Port: 53 - Click add
NAT Rule
We will now add a rule to allow us to RDP into the VM behind the firewall
- Go to the Firewall -> Rules
- Click Add NAT Rule
- Give it a name and set the Priority(lower the number the higher the priority)
- In the Rules IP Addresses section set the following:
– Give it a name
– Protocol: TCP
– Source type: Ip address
– source: to allow or RDP from everything put *. Otherwise put the public IP of your client device
– Destination Address: Public IP of the firewall
– Destination Port: 3389
– Translated Address: private IP of VM you want to RDP to
– translated port: 3389 - Click add
You should now be able to:
- RDP into the VM
- Be able to browse to microsoft.com but NOT other websites
Virtual WAN
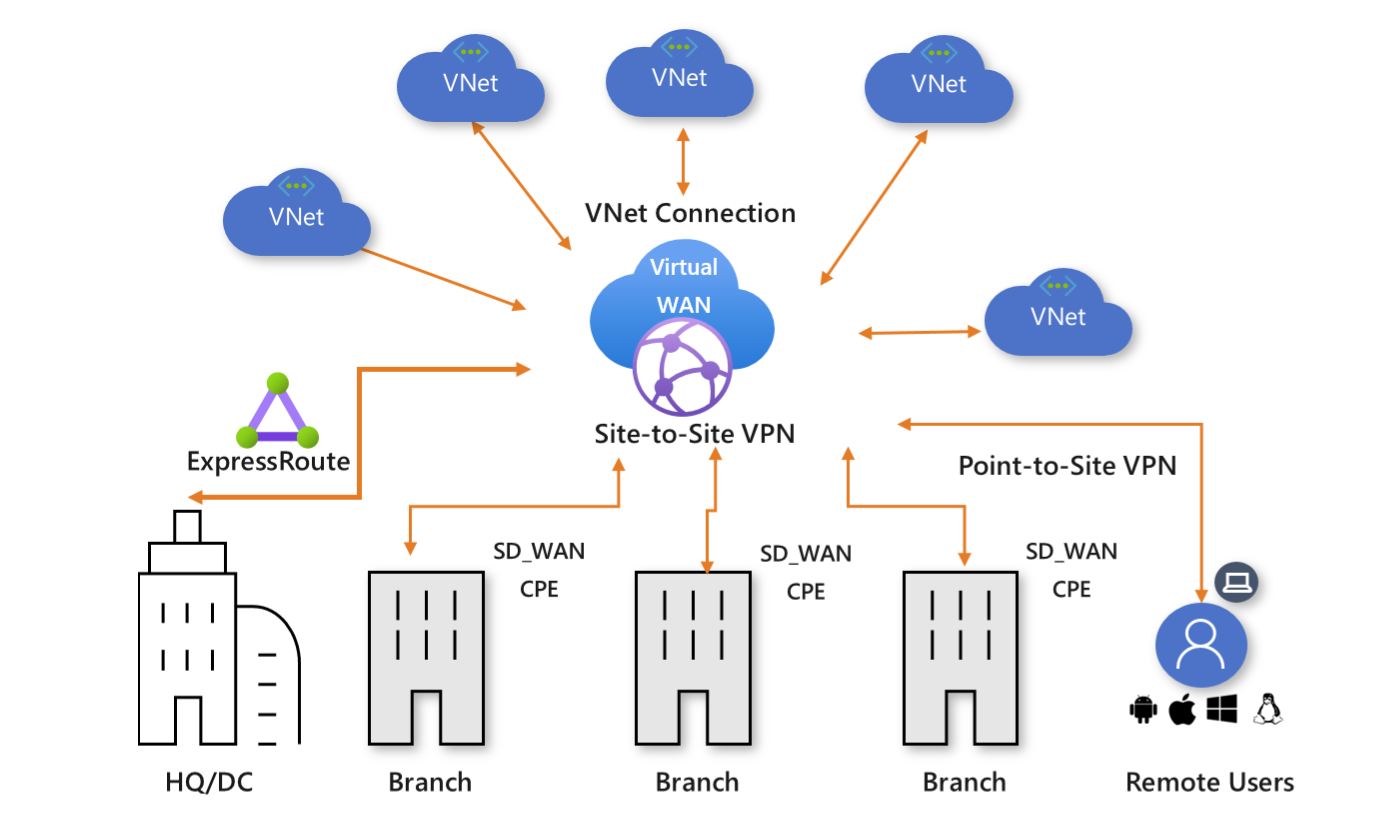
Azure Virtual WAN is a networking service that brings many networking, security, and routing functionalities together to provide a single operational interface.
The basic concept of this is using Azure as a virtual hub to connect two offices, in different locations, together. It is like site-to-site VPN, but instead of just connecting your site to the Azure Virtual Network, you can connect to another actual site. You can use it join together a mixture of On Premise sites and Virtual Networks

Creating Virtual WAN
- In Marketplace search for Virtual WAN
- Click Create
- Set your options:
– Subscription, resource group
– Give it a name
– Select the Type: Standard or Basic (Basic has fewer connectivity options) - Click on Create
- Go to the Resource
Hubs
The Hub is the central point or gateway to Azure. You need to add a Hub to the Virtual WAN. The Virtual WAN is free but the Hubs incur costs. There are different options for the Hubs-
Azure Virtual WAN Pricing
| Type | Price | Unit |
| Standard Virtual WAN Hub | $0.344/hour | 1 per deployment hour |
| Standard Virtual Hub/Secure Virtual Hub with third-party integrations | $0.550/hour | 1 per deployment hour |
| Standard Virtual WAN Hub data processing | $0.028/GB | Per GB |
| VPN S2S Scale Unit1 | $0.496/hour | 500 Mbps per Scale Unit |
| VPN S2S Connection Unit2 | $0.069/hour | 1 Connection |
| VPN P2S Scale Unit | $0.496/hour | 500 Mbps per Scale Unit |
| VPN P2S Connection Unit | $0.018/hour | 1 Connection |
| ExpressRoute Scale Unit3 | $0.577/hour | 2 Gbps per Scale Unit |
| ExpressRoute Connection Unit | $0.069/hour | 1 Connection |
From <https://azure.microsoft.com/en-au/pricing/details/virtual-wan/>

